Jack is an Architect in Wisconsin that has used Envisioneer since V1.0. He has provided Cadsoft with great ideas to strengthen the Envisioneer product yearly.
Jack has graciously shared one of his projects and tips for our Envisioneer users.
The Power of Envisioneer by Jack Zimmer – ZimmerDesign.com.

In the ‘olden days,’ paper plans, details, and an artist’s sketch would be presented. Envisioneer has provided a tool that generates the ‘olden days’ and virtual presentation options and communicates with other programs for import and export. Why reinvent the wheel? Specialty programs are used throughout the building industry, and Envisioneer exports to many. This gives users more control over plan/building accuracy and saves others time applying their solutions to the project.
By taking advantage of all Envisioneer provides, I can surpass expectations. Because of the speed involved in producing construction drawings, rendering, and exporting to animation, I can present, incorporate suggested changes, and present again efficiently and on time.
Example Envisioneer Project – my ‘largest’ project …….
Most people think of ‘largest’ as either size or cost. My ‘largest’ project started with discussion and presentations to a committee of 12 men and women about a new Church parking lot layout.
99 % of this video of the Church Design was created in Envisioneer and exported for animation.
Christ the King Church Beautification Preliminary on Vimeo
Google site images were imported into Envisioneer: landscaping surfaces and paths defined options for the lot. Stripes for parking space lines were narrow pads set to white. Included were walkways for the school children’s safety while navigating the traffic pattern.
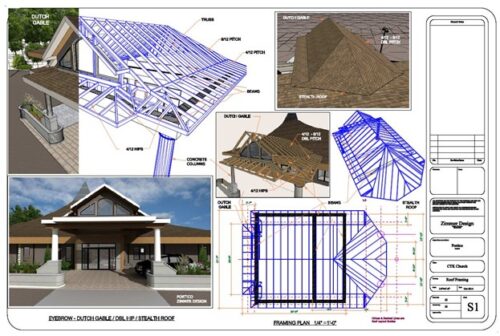
As the parking lot progressed, the topic of a new Portico entry came up. Imported .dwg Building plans were used to trace the basic church perimeter layout. (The curved Pyramid shaped roof was a challenge.)
Plans and Renderings of the new design for the Parking Lot and Portico (along with basic roof framing), were presented to the committee of 12.
For the first time in my life, I received a ‘sitting ovation.’
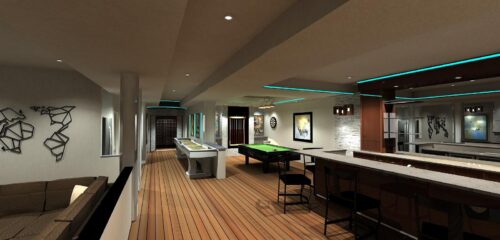
The new Portico led to a new Interior. I had the shell of the main Church, and the imported .dwg floor plans allowed the design of new interior spaces. A Narthex area, an Upper Welcome area with Side Entrance, a Conference room, Restroom, Kitchen access, Coffee Kiosk with sliding doors, raised Altar area, and a large Screen Monitor.
The Full model, with textures, was exported as a skp (SketchUp file) into an animation program. I generated camera paths, added music, and was ready for another big meeting.
Next came round table discussions with the mayor, council members, engineers, inspectors, and fire chief – 14 or more. They all poured over the 2D Plans, Elevations, Sections, Details, and Renderings. Each discusses runoff, retention ‘ponds’, method of Portico construction, access to building for fire trucks, lot size and capacity, the new pedestrian traffic pattern, etc.
I know that plans and details don’t communicate well for some people. So….
I handed my tablet, with Animation, to the lady next to me. Top Parking lot views, Portico views, and all the revisions to the interior of the existing Church came to life.
She shared the video on our side of the table. It was then passed around the table for all to view.
She then took control of the meeting and stated, ‘I think we all agree that this is a worthwhile project!’ The meeting ended positively.
I later learned she was the mayor.
My favorite tools in Envisioneer.
Right Click is your friend!
Import/ export of dwg, skp, jpg. / etc. They are extremely valuable in communicating with others, enhancing renderings, and creating excellent construction documents.
360 views knock the socks off all that see them. Put a swivel stool in a roughed-in space and view the 360 on a cell phone or tablet. I’ve used it to help define drop ceiling locations with HVAC. Example 360 Views can be seen here
TIPS while using Envisioneer.
Use Keyboard shortcuts F9 – Ortho, F5- Snap. I use them constantly, quick- easy on / off.
Learn the use of the Roof tool. It is extremely versatile and can create some amazing shapes.
Learn Structural Floors, Truss Runs, right click ‘Create Corner Opening’ and in Catalog, how to Add Elements.
The right click – Add Node option is handy in several instances, especially when working with Roofs.
The Room Division tool under Floors divides spaces. Also learn right click ‘Create Floor Opening’.
The Surface tool can create Angled Surface.
Right Click in Members under Custom, Add New Element, Select Tapered 3, go to Details, and enter 180 degrees to rotate it and then use Advanced Members to add it by Select Plane as a Ridge Cap on Roof.
Join the Community website. So many experienced users share their work and tips.
I will post examples of Roofs created in Envisioneer on the Community website. Joining is easy.
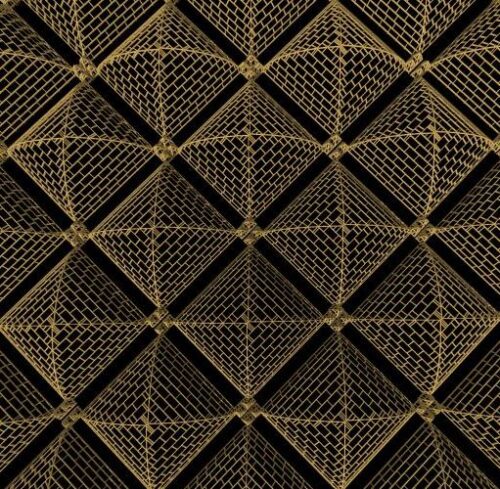
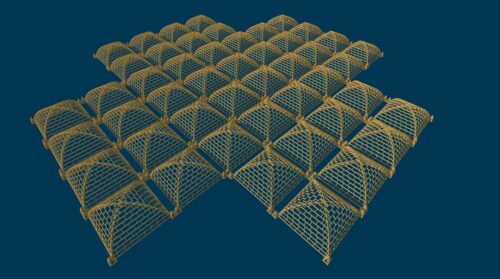
Top view of multiple vaults with framing showing in Envisoneer. Designed by Jack Zimmer