When migrating from a previous version of Envisioneer to the latest version, it is recommended that you save the following before uninstalling the old version:
- Customized textures
- Customized catalogs
- Customized templates
- Customized Quote Generator files
- Customized toolbar themes
- Customized keyboard shortcuts
This ensures that any content that you have customized in the old version is available in the new version.
Saving Textures from an Older Version
When you uninstall Envisioneer, the Textures folder is removed from your system. If you have started a project in a previous version that you would like to continue working on in the new version, and that project uses custom textures, you should back up your existing Textures folder before uninstalling.
If textures that you used previously are not available in a newer version, a project’s materials may not display correctly. If you back up your existing Textures folder, you can then re-direct your Textures path to the old Textures folder, or simply copy the contents of the old Textures folder into the new Textures folder.
To save textures from an older version:
- In Windows Explorer, locate your old Textures The default location for this folder is shown below.
C:\ProgramData\Cadsoft\Envisioneer\Textures
- Select the Textures folder, then right-click and select Copy.
- Select a location on your hard drive where you want to copy the Textures folder. This can be anywhere except the Envisioneer folder. For example, you may want to just copy it to the root (C:\).
- Right-click the new location and select Paste. The Textures folder is copied to the backup location. This folder will not be removed when you uninstall Envisioneer.
Once you have uninstalled your existing version and installed the new version, you can copy the textures from the old Textures folder into the Textures folder of the new version. If a texture already exists in the new Textures folder and you are prompted to replace it, select No so that you do not get duplicate entries.
Saving Catalogs
- It is highly recommended that you backup your catalog BEFORE you uninstall your current version. Your catalog is a .bdb file. The default location for this folder is shown below.
C:\ProgramData\Cadsoft\Envisioneer\Catalogs
- it will have a .bdb extension) and select Copy.
- Select a location on your hard drive where you want to copy the catalog file. This can be anywhere except the Envisioneer folder. For example, you may want to just copy it to the root (C:\).
- Right-click the new location and select Paste. The catalog file is copied to the backup location. This folder will not be removed when you uninstall Envisioneer.
Once you have uninstalled your existing version and installed the new version, you can copy the catalog into the new Catalogs folder of the new version.
NOTE: Not sure where your catalog is saved and the name of it? In Envisioneer go to File>Catalogs>Catalog Properties and it will list the name and the location of the file on your hard drive.
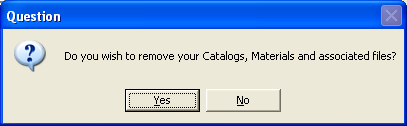
Alternatively, when you uninstall Envisioneer, you will be asked if you want to remove your Catalogs, Materials and associated files.
Click No. This will retain the Catalogs folder on your system. If you have customized any elements in the old catalog and would like to use those elements in the new version, you can import them into the Master Catalog of the new version. See the article titled Importing Content from an Older Catalog.
Saving Customized Templates
When you uninstall Envisioneer, the Templates folder is removed from your system. This folder houses both drawing templates and estimating templates. If you have customized either than you will want to backup the customized files in this folder.
To save templates:
- In Windows Explorer, locate your old Templates The default location for this folder is shown below.
C:\ProgramData\Cadsoft\Envisioneer\Templates
- Select the Templates folder, then right-click and select Copy.
- Select a location on your hard drive where you want to copy the Templates folder. This can be anywhere except the Envisioneer folder. For example, you may want to just copy it to the root (C:\).
- Right-click the new location and select Paste. The Templates folder is copied to the backup location. This folder will not be removed when you uninstall Envisioneer.
Once you have uninstalled your existing version and installed the new version, you can copy the templates from the old Templates folder into the Templates folder of the new version.
Quote Generator Files
If you are using Quote Generator and have customized the files to work with your Point of Sale system you will want to backup those customized files before you uninstall.
The default location for the Quote Generator files is shown below.
C:\ProgramData\Cadsoft\QuoteGenerator
- Select the Data folder, then right-click and select Copy.
- Select a location on your hard drive where you want to copy the folder. This can be anywhere except the Envisioneer folder. For example, you may want to just copy it to the root (C:\).
- Right-click the new location and select Paste. The data folder is copied to the backup location. This folder will not be removed when you uninstall Envisioneer.
- Ensure that you also save the QG.mdb file. This is the database file and is the most significant data. It is saved here: C:\ProgramData\Cadsoft\QuoteGenerator right in the root.
Once you have uninstalled your existing version and installed the new version, you can copy the files into the Quote Generator folder of the new version.
Saving Toolbar Themes
If you have customized the color scheme of your toolbars in your current version, you can save your toolbar setup as a theme and then load that theme in the new version of Envisioneer.
The folder that contains themes is removed from your system when you uninstall Envisioneer, so make sure you save your customized themes in a backup location that is outside the Envisioneer folder.
To save themes from an older version:
- In your current version of Envisioneer, select Settings > Program Settings.
- In the left pane of the Program Settings dialog, select Toolbars.
- In the lower right corner of the dialog, click the Save Theme
- In the Save As dialog, navigate to a folder that is outside of the Envisioneer folder, such as the root (C:\). Type a name for the theme in the File name edit box.
- Click Save to save the theme in the backup location.
To reload a saved theme in the new version:
- In the new version of Envisioneer, select Settings > Program Settings.
- In the left pane of the Program Settings dialog, select Toolbars.
- Click the Load Theme
- In the Open dialog, select the theme that you saved in the backup location, then click Open. Your custom theme is loaded.
Saving Keyboard Shortcuts
A keyboard shortcut can be a single button on your keyboard or a sequence of buttons that you press to invoke commands. If you have customized keyboard shortcuts in your current version of Envisioneer, you can save them to a *.qck file that can then be re-loaded in the new version of Envisioneer.
The folder that contains keyboard shortcuts is removed when you uninstall Envisioneer, so make sure you save your custom shortcuts in a backup location that is outside the Envisioneer folder.
To save keyboard shortcuts from an older version:
- In your current version of Envisioneer, select Settings > Program Settings.
- In the left pane of the Program Settings dialog, select Keyboard.
- In the upper right corner of the dialog, click the Export
- In the Save As dialog, navigate to a folder that is outside the Envisioneer folder, such as the root (C:\). Type a name for the file in the File name edit box.
- Click Save. Your shortcuts are now saved in the backup location.
To reload saved shortcuts in the new version:
- In the new version of Envisioneer, select Settings > Program Settings.
- In the left pane of the Program Settings dialog, select Keyboard.
- Click the Import
- In the Open dialog, select the *.qck file that you saved in the backup location, then click Open. Your custom keyboard shortcuts can now be used in the new version.