There are several ways to insert walls in a model, each designed to suit different drafting situations and workflows. In Envisioneer, you can create walls using the following methods:
- Walls by Baseline
- Point-and-Click Method
- Insertion Offset Option
- Copying Existing Walls
- Walls by Perimeter
Understanding when to use each method can help you work more efficiently and speed up the modeling process. The following examples illustrate practical situations in which each wall insertion technique is most effective.
Walls by Baseline
When using the standard Walls tool to draw perimeter walls, the walls are created along their centerline. This means the line you draw represents the center baseline of the wall assembly.
If you need to draft using exact exterior dimensions — such as the outside face of the finish material or the stud line — the Walls by Baseline tool is the better choice. This method allows you to first draw a reference outline and then define how the wall should be offset from that line. For example, the baseline can represent the exterior finish face, the outside of the wall core or stud, or the interior face of the wall core or stud.
To draw walls from an offset baseline:
- Select Insert > Walls > Walls by Baseline, or click the drop-down arrow beside the Walls button on the Building toolbar and choose Walls by Baseline.
- In the catalog, select the wall type you want to insert. Move your cursor onto the drawing screen.
- Left-click to pick your start point that represents the first corner of your exterior walls.
- Move your cursor and note the Commander in the lower left corner of the screen. It lets you enter a precise length and direction of the next wall point. The Commander will show the distance and direction you are moving your cursor away from the first corner of the building.

- Either type a distance in the Commander and hit Enter for the next point, or left-click to select the next point.
- Continue drawing the outline of the exterior wall layout either by typing in exact dimensions using the commander or by picking points. When finished, right-click and select Finish.
Note: The walls will be offset from the outline you draw, so consider this when entering measurements. If you make a mistake while drawing, right-click and select Step Back to undo the last segment.
- In the Walls by Baseline dialog box, choose which wall face should align with the baseline you drew:
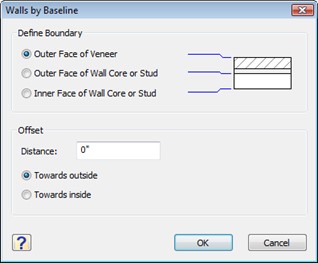
- In the Offset section, enter an offset value in the Distance box if required.
- If an offset distance is specified, choose the direction of the offset.
- Click OK to create the walls.
Point and Click to Insert Walls
You can simply left-click to indicate the start point of a wall, move your cursor and left-click again to draw a wall.
To draw walls:
- Select Insert > Walls > Walls, or click the down arrow next to the Walls by Baseline button and select Walls.
- In the catalog panel, select a wall.
- Move your cursor onto the drawing screen area and left-click to indicate the start point of the wall.
- Move the cursor, then left-click to indicate the end point of the wall. As you move your cursor you can also type exact dimensions in the Commander. The dimensions are from the centerline of the wall start point to the centerline of the wall endpoint.
NOTE: If you are drawing interior walls and want to connect them to an exterior wall, put your cursor in the stud portion of the wall, and you will notice the OBJSNAP symbol appear. Always wait for the symbol to ensure you are snapping to the wall.
NOTE: If you have inserted a wall incorrectly, you can quickly undo the work. The Undo tool cancels your most recent action. You can undo as many actions as you have taken since your last save. To undo an action: Select Edit > Undo, or Press Ctrl+Z or Click on the Standard toolbar.
Insertion Offset Method to Insert Walls
When you want to start a wall a set distance from a corner, you can use the Insertion Offset option.
To insert walls offset a set distance:
- Select Insert > Walls > Walls, or click the down arrow next to the Walls by Baseline button and select Walls.
- In the catalog panel, select a wall.
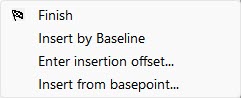
- Move your cursor to the drawing screen area and right-click to reveal options for inserting the wall.
- A small dialog box will appear. Select Enter insertion offset
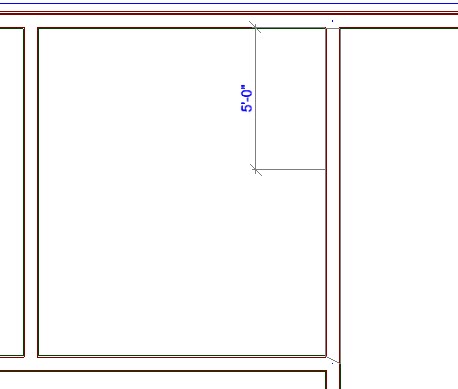
- The Enter insertion offset dialog box will appear. Enter the distance you want to set this wall away from an existing wall corner. Click OK.
- Place your cursor on an existing wall, and the offset dimension will appear to show you where your wall will start along that wall, the offset distance from the closest corner. When you have it at the correct spot, left-click to insert it.
- Move your cursor away to start drawing the wall from the insertion point. Left-click to end the wall.
Copy Walls
You can select existing walls in a project and copy them to create a duplicate of the wall elsewhere in your model.
To copy walls:
-
-
- Left-click on an existing wall in your model. Right-click and select Duplicate.
- The cursor immediately changes to a Move cursor. Put your cursor on the wall, and hold down your left mouse button. Drag a copy of the wall to the new position in your model.
- Release the left mouse button, and the wall copy is set.
-
Walls By Perimeter
When you have a slab or an enclosed wall layout already inserted in your model, you can use it as a tracing line to insert a set of walls around the perimeter of the slab or walls.
To insert walls by perimeter:
-
- Select Insert>Walls>Walls by Perimeter or the Walls by Perimeter icon.
- In the Catalog Panel, select a wall.
- Left-click inside the perimeter of a slab or existing wall perimeter.
- The Wall by Perimeter dialog box appears, select the wall face that you would like to serve as the offset baseline. You can choose either;
-
- Outer Face of Veneer
- Outer Face of Wall Core or Stud
- Inner Face of Wall Core or Stud.
- In the Offset area, specify an offset distance in the Distance edit box, if desired.
- If you have specified an offset distance, select the direction in which you want to offset the walls from the baseline, either towards outside or towards inside.
- Click OK.