Video: https://youtu.be/NNcEr-Fryl0
Transcript:
Envisioneer can import materials to apply objects in a project for a truly personalized experience.
Sourcing the Material
Depending on what you are going to be using the material for, will dictate where you can source the file from.
If you are looking for a specific material from a manufacturer, you can find the image or texture on their website or by searching online for a texture that closely matches what you are trying to replicate. Using a search engine like Google™ and entering key phrases like Seamless Texture will help narrow down the results.
If you are trying to match an existing finish, you can take a picture of it with your camera and then save the image to a computer so that you can edit it.
When sourcing your textures, look for either JPEG or PNG formats unless you are creating a transparent image, in which case you should save them in BMP or PNG format.
Once you have found the material you want to use, you can then save the material to your computer.
Editing the Material
When you apply a material in Envisioneer, it copies it across the face of the receiving object. If the material is smaller than the object, it will continuously repeat the material to fill the face of the object. This can have some undesirable effects if the material has a definite edge repeated across the object’s face, making the material appear fake. Once you have the material saved to your computer, you can start to edit it if needed to remove parts of the material that would make it not repeat nicely.
If you have a photo editing software like Photoshop™ you can open it in that application. If not, using Microsoft Paint™ will work as well.
The purpose of editing the material is to make sure that when it is tiled, it will look seamless in your design. You do not want parts to be brighter than others or to have the edges of the texture visible when tiled.
For You to Try
The steps outlined below are for a specific material edited in Microsoft Paint™. The material you are using may require additional editing, and if you use a different photo editor, the steps may also differ.
- Open the texture you have saved in Microsoft Paint™.
- Make sure to zoom out so everything is visible on the screen.
- Under Home, use the Select option to create a window around the portion of the texture you want to use. Since we are trying to create a seamless texture, we will select from one edge of the batten to the other.
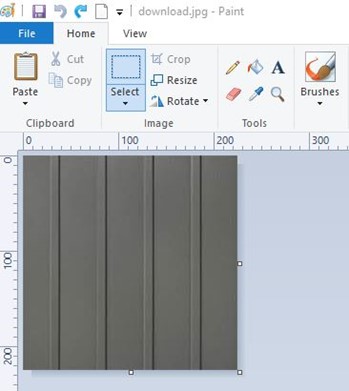
- Select the Crop This will cut away the excess from the image
- Select File > Save As. If you want to override the name of the original texture, then use the same name. If you want to keep the original, then give the file a new name and save it in the C:\ProgramData\Cadsoft\Envisioneer 17\Textures.
*If you do not see ProgramData, you must enable “Show hidden files, folders and drives“. This can be done within the File Explorer dialogue by going to View > Options > View >Hidden files and folders.
Note: If the material you are bringing in has a transparent portion, you must make sure that the area that will be transparent is set to magenta with the RGB value of 255,0,255. The texture itself must be saved as a Bitmap.
Adjusting the Material Properties
Once the edited texture file is saved to the Texture folder, you can create a new texture within Envisioneer.
For You to Try
- In Envisioneer select File > Catalogs > Library Manager > Libraries > Materials.
- Navigate to the folder where you want to save your new material. As an example, we will save it to the Wood Panels folder. Select the last texture in the list, right-click it, and select Add Material.
Note: Depending on what material you are trying to create you will need to navigate to the appropriate folder, for example if you are adding in a brick pattern then you would want to add this to the Brick folder.
- In the Material Properties dialog under the Properties tab, give the new material a name.
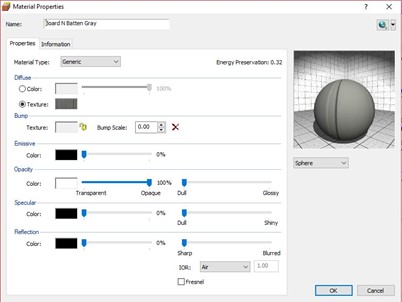
- Under Diffuse you will select the Texture option and then select the preview of the texture.
- This will open the Texture Map dialog, where you select the texture. Press the Select button, and in the Open dialogue, locate your texture file.
- Back in the Texture Map dialog you can control the Tile Height and Tile Width. The values are directly related to the texture and size of the material sample. For example, in the texture example, there are 4 boards. Each board is 7 1/2″. Therefore the total width is 30″. The height of the sample material is 8′.
Note: If a portion of the material is transparent, check the Make Magenta Color Transparent option in the Texture Map dialog.
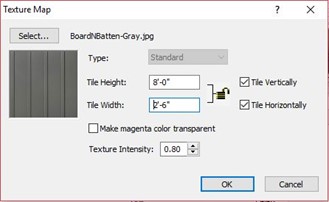
Texture Intensity controls the brightness and contrast of the texture. Values range from 0.00 to 2.00.
- Click OK to return to the previous dialog.
- If you are adding a texture with raised edges or wrinkles, you may want to take advantage of the Bump feature. This will help give the texture the appearance of depth when rendered.
- The Emissive option lets you control how much light the texture gives off.
- The Opacity option controls how transparent the texture is.
- The Specular option controls how shiny a texture is.
- The Reflection option allows you to control how reflective a texture is.
- The IOR or Index of Refraction. This describes the way light bends when crossing the material surface. A value of 1.0 means the light will not change direction. Selecting a material from the drop box (e.g. Air, Water, Crystal, Glass, etc.) populates the IOR edit box with the Index of Refraction for that material. If you prefer to specify a custom value, select Custom from the drop box, then specify a value in the IOR edit box.
- Fresnel – When enabled, the reflection strength becomes dependent on the viewing angle of the surface. Some materials in nature (glass, etc.) reflect light in this manner. Note that the Fresnel effect depends on the Index of Refraction.
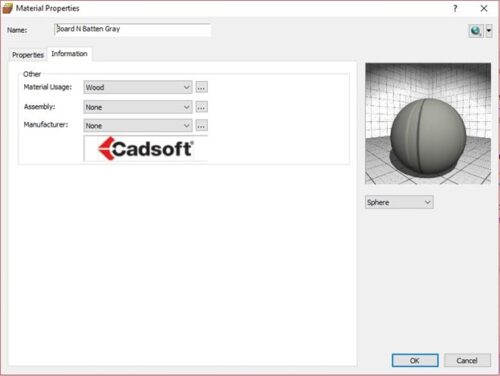
- Select the Information tab.
- Set the Material Usage option to the correct usage.
NOTE: The usages filter the materials list and efficiently finds a material using the Paintbrush feature.